Manage Local Computing Resource using MAAS
Besides managing bare metal machines, MAAS (Metal as a Service) can also manage KVM guests as long as those machines are boot from network PXE. This feature allow us to efficiently manage local computing resources, while at the same time, leverage JuJu for automatically middle ware deployment. In this post, I will detail steps to manage KVM guest machines using MaaS.
System diagram
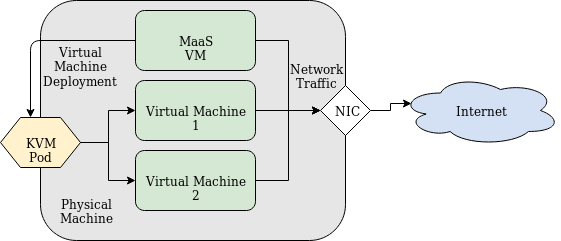
MaaS Managed Machine: MaaS Virtual Machine creates other Virtual machines through KVM Pod. All VMs access the internet through physical machine’s NIC using NAT.
The MaaS server will be deployed to a virtual machine running inside the physical machine. The reason for installing MaaS into a virtual machine instead of directly install to the physical machine is that we want to have the flexibility of VMs as we want to update MaaS version, or backup… The MaaS server will manage its “parent” physical machine resources through KVM pod.
All machines will access to the Internet through physical machine’ NIC using NAT.
We could easily extend this diagram by adding more virtual NIC for more complex networks. We could also easily add another physical machines to MaaS, as long as the machine could be reachable by MaaS VM.
The Internet access for MaaS server is necessary because MaaS needs to fetch OS images from the remote repository.
Preinstall preparation
We will need to install kvm to the physical machine. The procedure to install KVM on Ubuntu Linux could be referred at https://help.ubuntu.com/community/KVM/Installation.
Because MaaS server will manage network resources, we need to make the modification to the “default” network to disable the DHCP for this network. MaaS needs to manage its network using DHCP in order to boot machine and automatically install OS.
To disable default, in virt-manager UI, we go to
Virt-Manager UI > Edit > Connection Details > [Virtual Networks] Tab
Remove the default network by stopping and deleting it. Re-add a new network name it “default”. Modify its IP if you prefer (in my case, I use 10.23.23.0/24), remember to uncheck “Enable DHCPv4” option. Accepts other options as default.
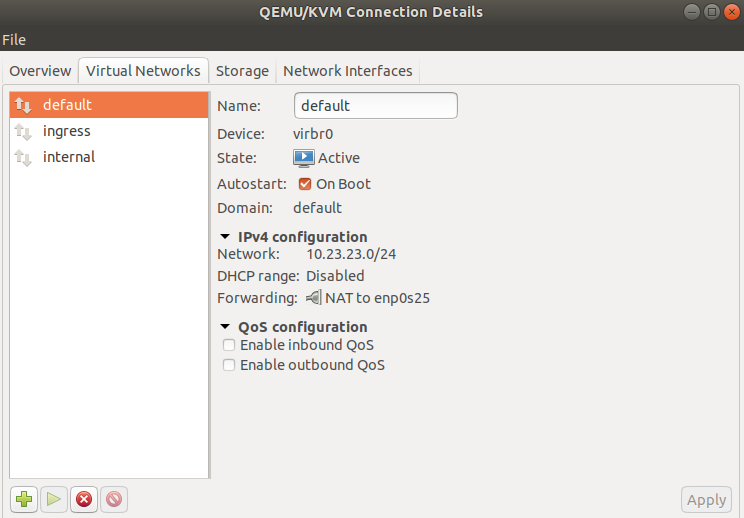
Default Network with DHCP disabled and is NATed to the physical NIC. With network ready, we go to install MaaS
Install MaaS Server
MaaS Installation
For MaaS server, we will need to use normal kvm management client to create MaaS VM. We also need to download Ubuntu .iso from Ubuntu Linux homepage to install it.
The process of install MaaS is similar to installation of Ubuntu Server. MaaS Server Settings. Because we disabled DHCP, MaaS will not be allocated IP address, so we need to access the machine in console and setup its network.
I login into the machine console and make the following modification to /etc/netplat/50-cloud-init.yaml
$ vim /etc/netplan/50-cloud-init.yaml
# This file is generated from information provided by
# the datasource.  Changes to it will not persist across an instance.
# To disable cloud-init's network configuration capabilities, write a file
# /etc/cloud/cloud.cfg.d/99-disable-network-config.cfg with the following:
# network: {config: disabled}
network:
    ethernets:
        ens3:
            addresses:
            - 10.23.23.2/24
            gateway4: 10.23.23.1
            nameservers:
                addresses:
                - 10.23.23.1

        ens9:
            addresses:
            - 10.4.23.2/24
            dhcp4: false
     version: 2

$ netplan apply
Other settings like hostname … could also be performed here. After setting up, reboot the machine for all settings applied, and to confirm that we have no problem when rebooting machines.
MaaS Installation
MaaS Installation is easily using apt
$ sudo apt install maas
…
  Applying metadataserver.0011_script_metadata... OK
  Applying metadataserver.0012_store_script_results... OK
  Applying metadataserver.0013_scriptresult_physicalblockdevice... OK
  Applying metadataserver.0014_rename_dhcp_unconfigured_ifaces... OK
  Applying metadataserver.0015_migrate_storage_tests... OK
  Applying metadataserver.0016_script_model_fw_update_and_hw_config... OK
  Applying metadataserver.0017_store_requested_scripts... OK
  Applying metadataserver.0018_script_result_skipped... OK
  Applying piston3.0002_auto_20151209_1652... OK
  Applying sessions.0001_initial... OK
  Applying sites.0001_initial... OK
  Applying sites.0002_alter_domain_unique... OK
Setting up maas (2.4.2-7034-g2f5deb8b8-0ubuntu1) ...
Processing triggers for libc-bin (2.27-3ubuntu1) ...
Processing triggers for systemd (237-3ubuntu10.19) ...
Processing triggers for ureadahead (0.100.0-20) ...
Processing triggers for ufw (0.36-0ubuntu0.18.04.1) ...
Processing triggers for dbus (1.12.2-1ubuntu1) ...
Processing triggers for rsyslog (8.32.0-1ubuntu4) ...

$ sudo maas init
Create first admin account:
Username: admin
Password:
Again:
Email: [email protected]
Import SSH keys [] (lp:user-id or gh:user-id):
After installing MaaS, confirm that we can open MaaS web interface by access to MaaS Server port 5240. In my case it is: http://10.23.23.2:5240/MAAS/#/dashboard
2 things needed doing after MaaS installation is
- Choose OS Image so MaaS can sync it from remote repository
- Synchronization your public key from github or launchpad as you could ssh into new virtual machines.
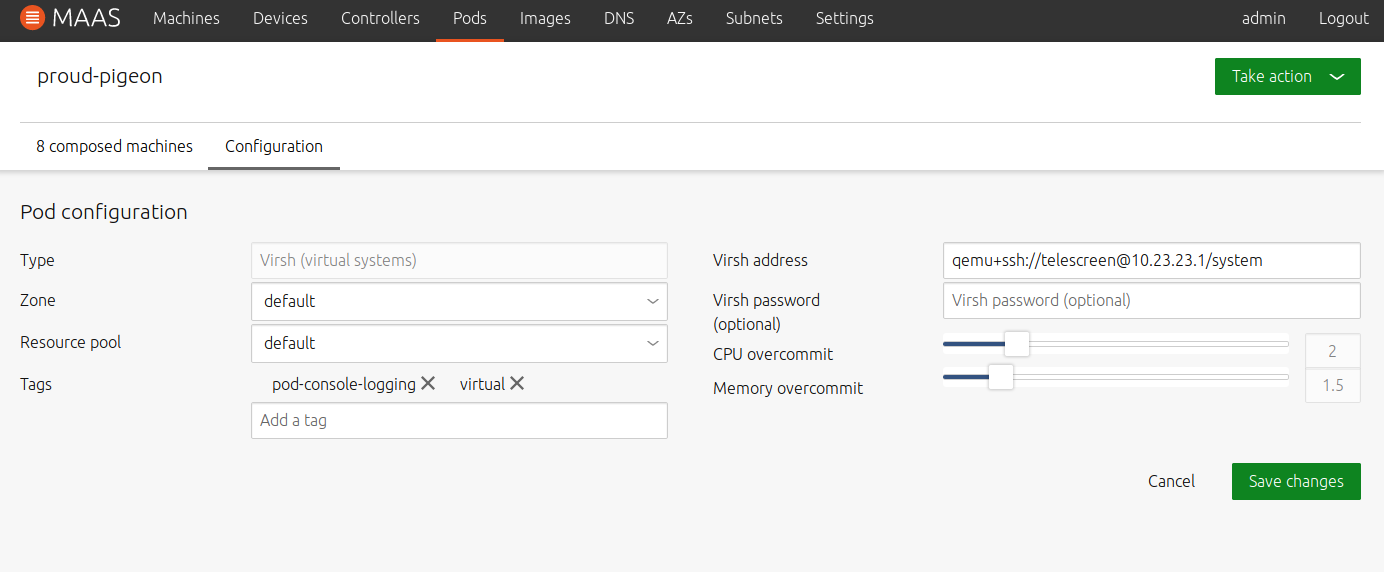
Setup KVM Pods
From MaaS version 2.6, MaaS server has one additional option to install KVM automatically. If you have existed machine, you should probably manually add physical machine to host to not break things.
In order to add physical machine to host, we add KVM pod to MaaS. In order for Pod to talk to physical machine, we add private ssh key to maas user to allow maas user to ssh to physical machine.
$ cd /var/lib/maas
$ sudo mkdir .ssh && sudo chown maas. .ssh && sudo chmod 700 .ssh
$ sudo vim .ssh/id_rsa
## PRIVATE KEY ##
## :wq
$ sudo chown maas .ssh/id_rsa && sudo chmod 600 .ssh/id_rsa
Open MaaS Web UI and add pods with virsh address as follows
qemu+ssh://$USERNAME:10.23.23.1/system
Because our host ip address from virtual machine will have the ip address of 10.23.23.1, we add that IP as hypervisor endpoint. One thing to notice here is that the $USERNAME should be able to communicate with local hypervisor without the need to sudo. In the other words, the user in physical machine should belong to libvirt group.
Provision Virtual Machine
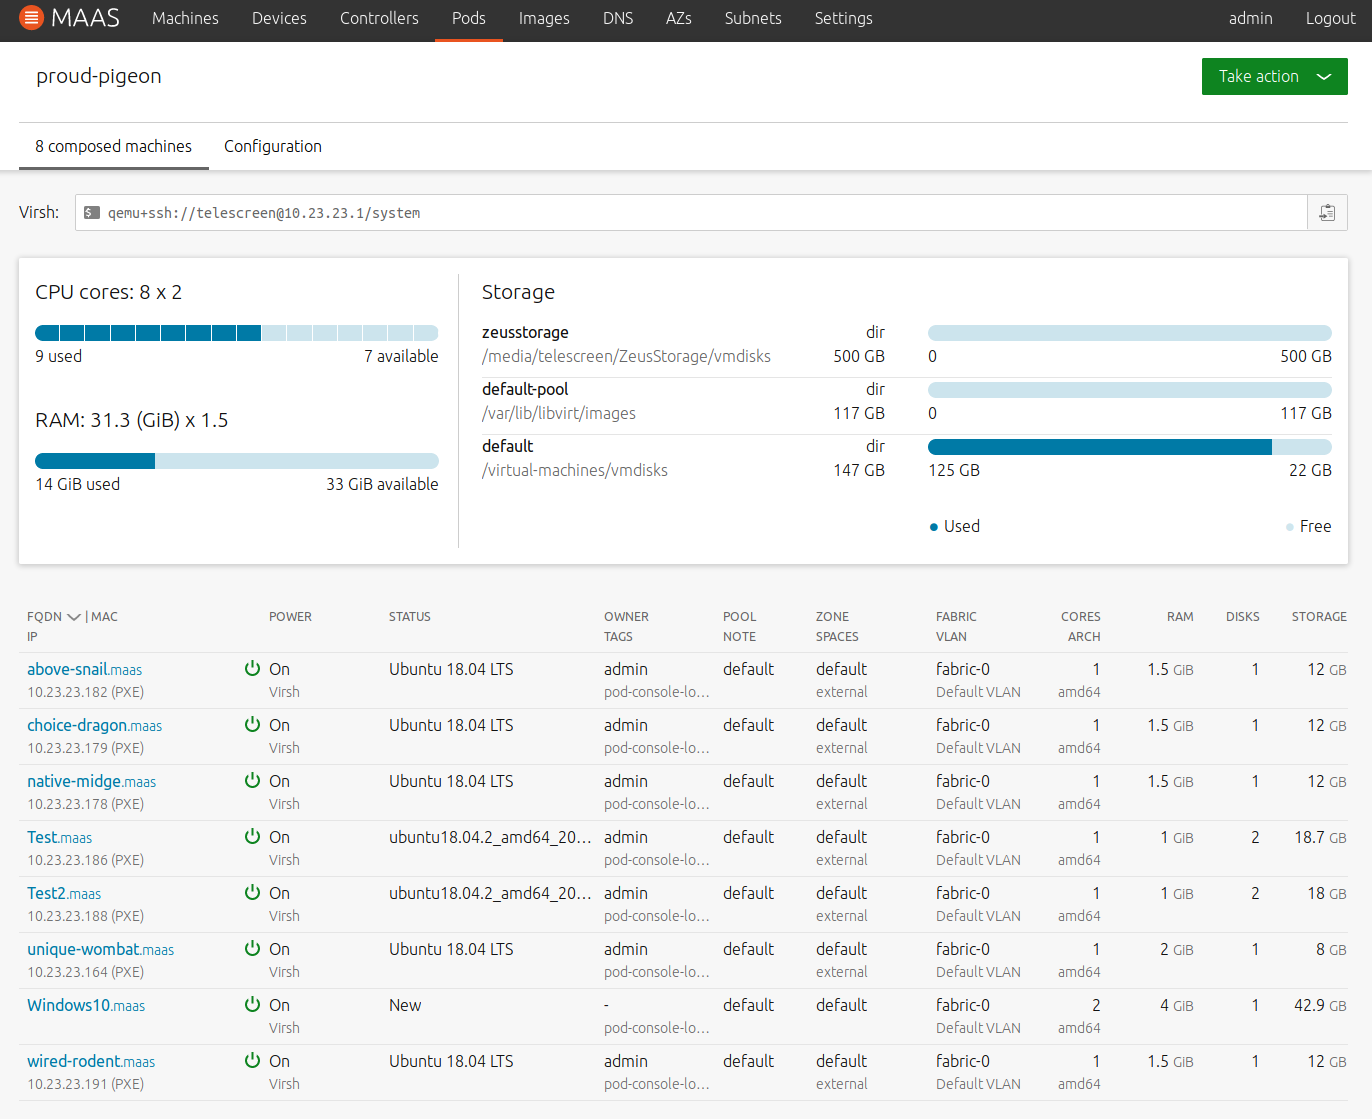
If every step works without problem, you should be able to to see the Pods Summary with the number of virtual machines, its specifications. In my case, I have a machine with 16 cores and and 32GB of RAM memory. I have 3 storage pools with different size and specifications.
Provisioning a machine is as simple as clicking [Take action] button and choose [Compose]
Summary
In this post, I wrote about steps to add physical machines to MaaS server to allow MaaS to manage local computer resources, turn local computer into a cloud like environment. In next sections, I will write in more details about how to manage virtual machines, how to combine JuJu with local maas to rapidly deploy experiment Linux environment.